Difference between revisions of "Image Editor"
From Help
| (2 intermediate revisions by the same user not shown) | |||
| Line 1: | Line 1: | ||
| − | + | =Overview= | |
| + | Image editor application allows you to make basic changes to your picture file(s). Supported file formats are: jpg, jpeg, gif and png. | ||
| − | + | =Choose Image for Manipulation= | |
| − | + | #Choose image directory from drop-down list | |
| − | + | #Choose image file from drop-down list | |
| − | + | #Chosen image file and its details will be displayed within the interface. | |
| − | + | #In order to download and save a file on local PC, click Download button. | |
| − | + | #Click Edit button to edit an image file. | |
| − | |||
| − | |||
| − | |||
| − | |||
| − | |||
<br> The Image Editor allows you to modify images you have uploaded or selected from the library. The Image Editor consists of the following: | <br> The Image Editor allows you to modify images you have uploaded or selected from the library. The Image Editor consists of the following: | ||
| Line 17: | Line 13: | ||
<br> | <br> | ||
| − | + | [[Image:Untitledpic0.JPG]] | |
| − | + | =An in-depth look at Image Editor Tools= | |
<br> '''[[Image:Untitledpic2.JPG]]''' | <br> '''[[Image:Untitledpic2.JPG]]''' | ||
| Line 35: | Line 31: | ||
5. Once you have completed editing image, click Apply to accept changes or Cancel to discard. | 5. Once you have completed editing image, click Apply to accept changes or Cancel to discard. | ||
| − | + | =Upload Image= | |
| − | |||
| − | |||
| − | |||
| − | |||
| − | |||
| − | |||
| − | <br> | + | <br> In order to activate the Upload Image functionality, click the '''Upload''' button. |
| − | + | #Select directory from the drop down menu on top of the page to upload image into. You can also choose to create a new directory. | |
| + | #In order to create a new directory, click '''Create Directory''' button. | ||
| + | #Click '''Browse''' and choose image file to upload. | ||
| + | #Click '''Upload''' to complete the operation or Cancel to discard changes. | ||
[[Category:Design]] | [[Category:Design]] | ||
Latest revision as of 08:48, 29 March 2012
Contents
Overview
Image editor application allows you to make basic changes to your picture file(s). Supported file formats are: jpg, jpeg, gif and png.
Choose Image for Manipulation
- Choose image directory from drop-down list
- Choose image file from drop-down list
- Chosen image file and its details will be displayed within the interface.
- In order to download and save a file on local PC, click Download button.
- Click Edit button to edit an image file.
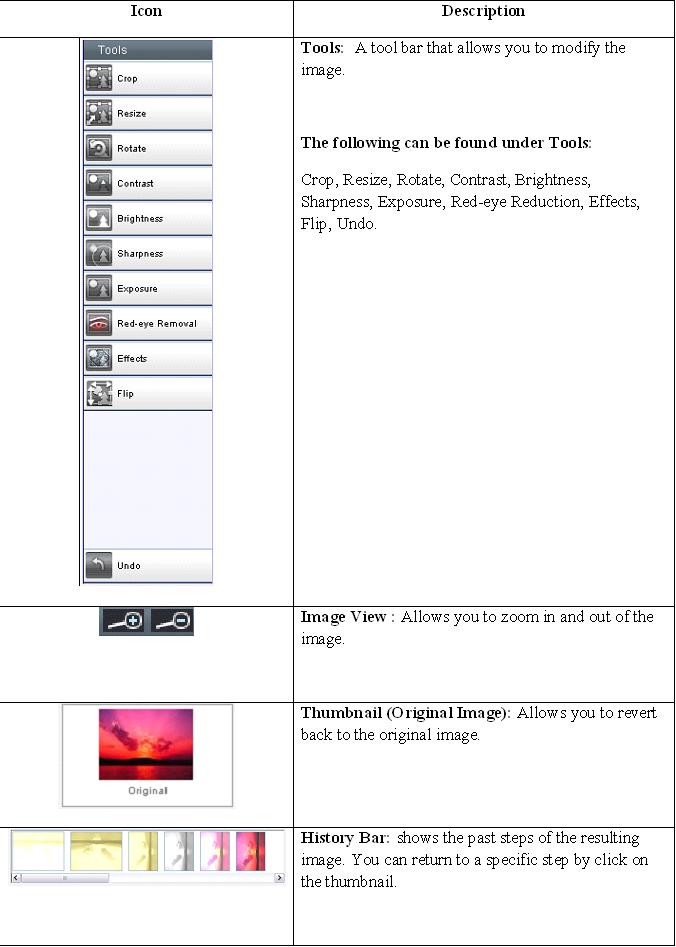
The Image Editor allows you to modify images you have uploaded or selected from the library. The Image Editor consists of the following:
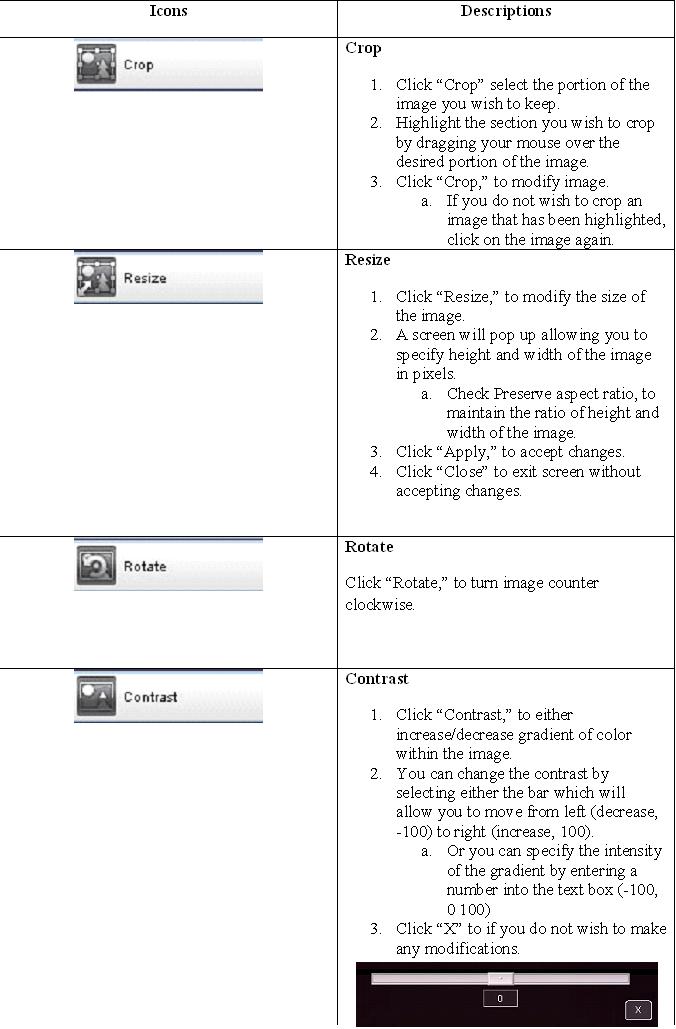
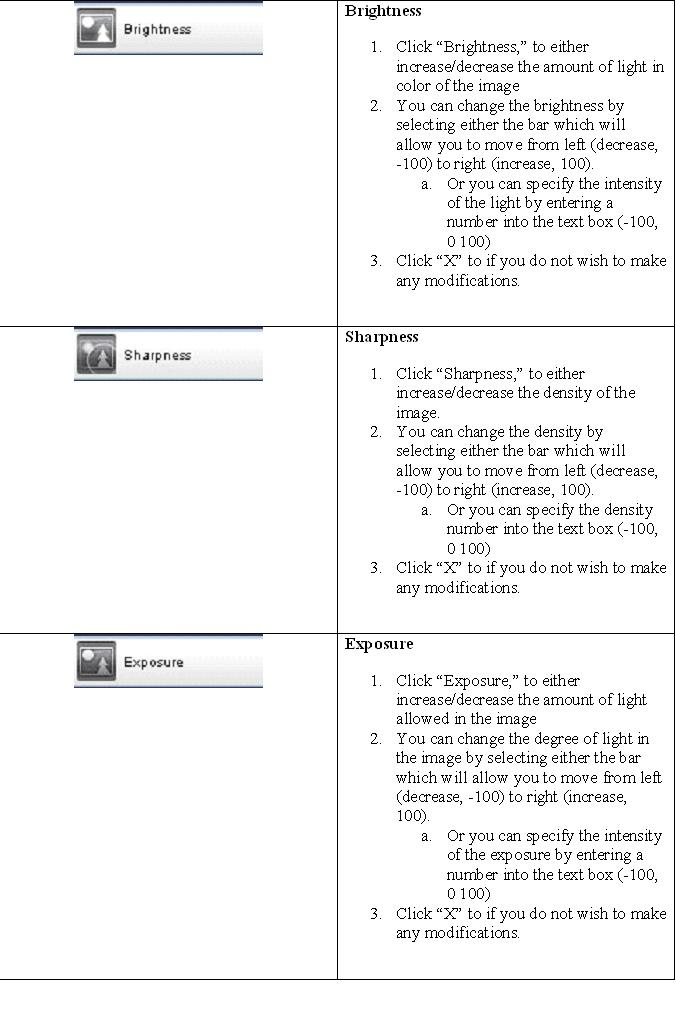
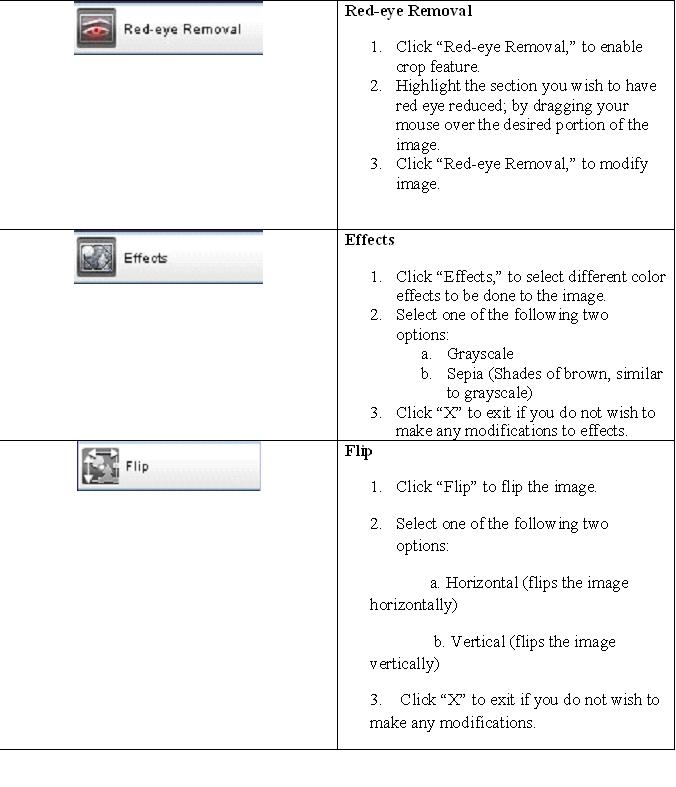
An in-depth look at Image Editor Tools
5. Once you have completed editing image, click Apply to accept changes or Cancel to discard.
Upload Image
In order to activate the Upload Image functionality, click the Upload button.
- Select directory from the drop down menu on top of the page to upload image into. You can also choose to create a new directory.
- In order to create a new directory, click Create Directory button.
- Click Browse and choose image file to upload.
- Click Upload to complete the operation or Cancel to discard changes.
